TShopping

 找回密碼
 註冊
搜索
TShopping 精選文章 Android 手機開發 查看內容

Android Studio 放入google Admob廣告

2016-7-1 08:14| 發佈者: woff| 查看: 7320| 評論: 0|原作者: woff

摘要: 完成圖 在Android Studio軟體下使用google Admob廣告,與eclipse用法有些出入 eclipse可參考這兩篇 Android 程式置入 AdMob 廣告 AdMob廣告實作 在Android Studio先建新專案 並下載Google Repository選擇“To ...
 
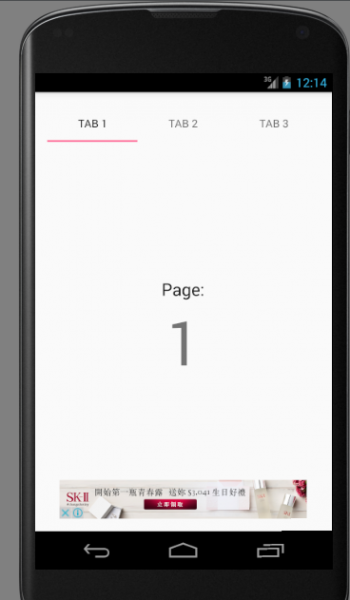
完成圖

3.png

在Android Studio軟體下使用google Admob廣告,與eclipse用法有些出入

eclipse可參考這兩篇
Android 程式置入 AdMob 廣告
AdMob廣告實作

在Android Studio先建新專案

並下載Google Repository選擇“Tools”(工具)>“Android”>“SDK Manager”
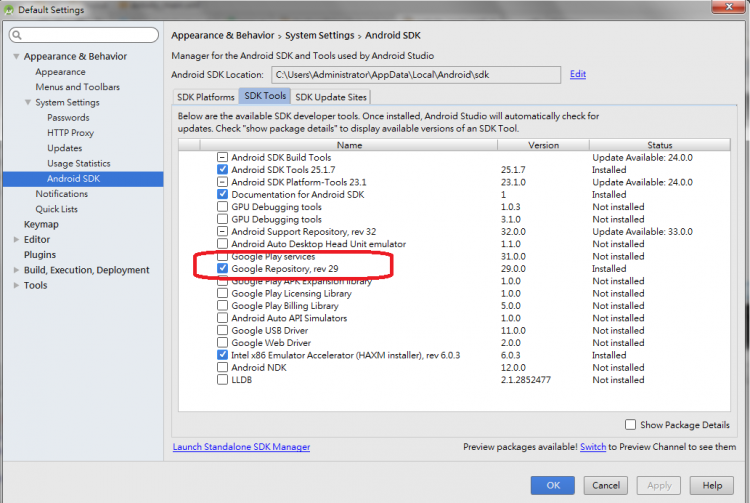
1.png

在Android SDK Manager窗口中,選擇SDK Tools下的Google Repository,然後按Install Packages(安裝程序包)並接受許可協議以開始下載。

配置Gradle


build.gradle(Module:app)
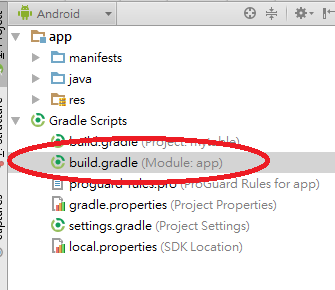
2.png

  1. dependencies {
  2.         compile fileTree(dir: 'libs', include: ['*.jar'])
  3.         compile 'com.android.support:appcompat-v7:21.0.0'
  4.     }
複製代碼

加入
  1. compile 'com.google.android.gms:play-services:6.+'
複製代碼


AndroidManifest.xml
<?xml version="1.0" encoding="utf-8"?>
<manifest xmlns:android="http://schemas.android.com/apk/res/android"
    package="com.google.android.gms.example.bannerexample" >

    <!-- Include required permissions for Google Mobile Ads to run-->
    <uses-permission android:name="android.permission.INTERNET"/>
    <uses-permission android:name="android.permission.ACCESS_NETWORK_STATE"/>


    <application
        android:allowBackup="true"
        android:icon="@drawable/ic_launcher"
        android:label="@string/app_name"
        android:theme="@style/AppTheme" >
        <!--This meta-data tag is required to use Google Play Services.-->
        <meta-data android:name="com.google.android.gms.version"
        android:value="@integer/google_play_services_version" />

        <activity
            android:name=".MainActivity"
            android:label="@string/app_name" >
            <intent-filter>
                <action android:name="android.intent.action.MAIN" />

                <category android:name="android.intent.category.LAUNCHER" />
            </intent-filter>
        </activity>
        <!--Include the AdActivity configChanges and theme. -->
        <activity android:name="com.google.android.gms.ads.AdActivity"
            android:configChanges="keyboard|keyboardHidden|orientation|screenLayout|uiMode|screenSize|smallestScreenSize"
            android:theme="@android:style/Theme.Translucent" />

    </application>

</manifest>

您需要完成以下三項更改:

1.為INTERNET和ACCESS_NETWORK_STATE添加兩個<uses-permission>標記。INTERNET的標記是必需的,用於訪問互聯網以發送廣告請求。 ACCESS_NETWORK_STATE是可選的,用於在發出廣告請求前檢查是否有可用的互聯網連接。
2.添加一個引用Google Play服務版本的<meta-data>標記。這會讓Android知道您的應用希望使用哪個版本的服務。
3.添加具有configChanges和theme屬性的<activity>元素。當橫幅廣告被點擊或展示插頁式廣告時,SDK會使用此活動,而且與其他活動一樣,必須在展示之前在清單中聲明此活動。
請重新構建該項目以確保所有更改均正確完成。現在您應該仍看到相同的“Hello world!”消息,但通過正確配置應用清單,您的應用將能夠使用移動廣告。

為應用指定廣​​告單元ID

activity_main.xml
<RelativeLayout xmlns:android="http://schemas.android.com/apk/res/android"
    xmlns:tools="http://schemas.android.com/tools" android:layout_width="match_parent"
    xmlns:ads="http://schemas.android.com/apk/res-auto"
    android:layout_height="match_parent" android:paddingLeft="@dimen/activity_horizontal_margin"
    android:paddingRight="@dimen/activity_horizontal_margin"
    android:paddingTop="@dimen/activity_vertical_margin"
    android:paddingBottom="@dimen/activity_vertical_margin"
    tools:context=".MainActivity">

加入代碼
  1. <com.google.android.gms.ads.AdView
  2.         android:id="@+id/adView"
  3.         android:layout_width="wrap_content"
  4.         android:layout_height="wrap_content"
  5.         android:layout_centerHorizontal="true"
  6.         android:layout_alignParentBottom="true"
  7.         ads:adSize="BANNER"
  8.         ads:adUnitId="你的廣告id">
  9.     </com.google.android.gms.ads.AdView>
複製代碼

將以下兩項內容添加到XML:

一個用於廣告的命名空間:
  1. http://schemas.android.com/apk/res-auto
複製代碼

1.一個針對AdView的新元素。系統會要求您提供layout_width和layout_height。2.您可以將這兩項都設置為wrap_content。
在AdView標記中,將adSize設置為BANNER並將adUnitId設置為 你的廣告id

MainActivity.java加入
  1. import com.google.android.gms.ads.AdRequest;
  2. import com.google.android.gms.ads.AdView;
複製代碼

protected void onCreate(Bundle savedInstanceState) {
        super.onCreate(savedInstanceState);
        setContentView(R.layout.activity_main);

        AdView mAdView = (AdView) findViewById(R.id.adView);
        AdRequest adRequest = new AdRequest.Builder().build();
        mAdView.loadAd(adRequest);

}

請執行以下兩項更改:

導入AdRequest和AdView類。
1.添加將在佈局中找到AdView的代碼,並創建AdRequest,然後使用它將廣告加載到AdView中。
2.完成這兩項更改後,您已大功告成!現在您應用的主活動中包含一個具有完整功能的AdView。

最新評論


Archiver|手機版|小黑屋|免責聲明|TShopping

GMT+8, 2024-4-27 02:27 , Processed in 0.060664 second(s), 23 queries .

本論壇言論純屬發表者個人意見,與 TShopping綜合論壇 立場無關 如有意見侵犯了您的權益 請寫信聯絡我們。

Powered by Discuz! X3.2

© 2001-2013 Comsenz Inc.

返回頂部