|
|
背景消除或背景減法是這樣一種假設。我們有2個圖片,一個是靜止的,比如場景,沒有需要檢測的東西,另一個照片則包含了要檢測的對象,但他是侵入了背景裡的東西,或對象。我們就是要檢測這個東西,比如商場進入的小偷,老鼠,或者馬路上通過的車輛。
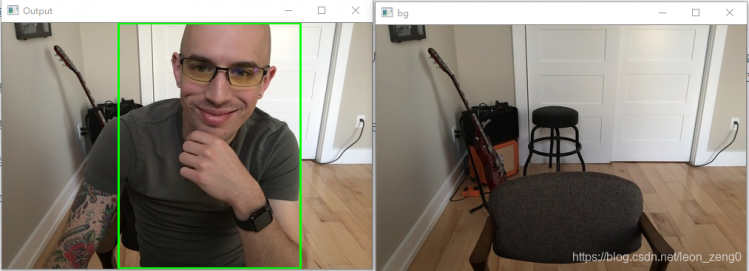
利用背景減法,我們容易找到我們感興趣的東西。先看看下面2張圖片:
Python opencv 背景消除 圖片減法

右邊圖片是我們的背景,左邊圖片是我們的結果,我們找到感興趣的部分,就是框起來的部分。框起來前就是我們對比的圖片,或者叫變化的圖片。有這個教授坐在椅子上的部分。
本程序除了opencv要安裝好外,還要裝好imutils。imutils的下載和安裝在 Python下應用opencv的簡單功能演示 一文中有介紹。
本文的原始代碼來自 https://www.pyimagesearch.com/2016/11/21/raspbian-opencv-pre-configured-and-pre-installed/ 的一個教學講稿。
代碼開始部分
註釋裡介紹使用方法:
python image_sub.py --bg 背景文件名 --fg 前景文件名
然後輸入必要的包,命令行參數處理,這裡有缺省參數,你可修改default 後的文件路徑和名
- # USAGE 使用方法
- # python image_sub.py --bg images/bg.jpg --fg images/adrian.jpg
-
- # import the necessary packages 输入必要的包
- import numpy as np
- import argparse
- import imutils
- import cv2
-
- # construct the argument parser and parse the arguments
- # 命令行参数处理,2个图片都存在imges 目录里,这里提供缺省值
- # 这根据你的情况,更改default 后的文件名,当然也可命令行输入
- ap = argparse.ArgumentParser()
- ap.add_argument("-b", "--bg", default='images/bg.jpg',
- help="path to background image")
- ap.add_argument("-f", "--fg", default='images/adrian.jpg',
- help="path to foreground image")
- args = vars(ap.parse_args())
導入圖片並灰度化處理
- # load the background and foreground images
- # 导入背景,前景文件
- bg = cv2.imread(args["bg"])
- fg = cv2.imread(args["fg"])
-
- # convert the background and foreground images to grayscale
- # 灰度化处理
- bgGray = cv2.cvtColor(bg, cv2.COLOR_BGR2GRAY)
- fgGray = cv2.cvtColor(fg, cv2.COLOR_BGR2GRAY)
背景減法
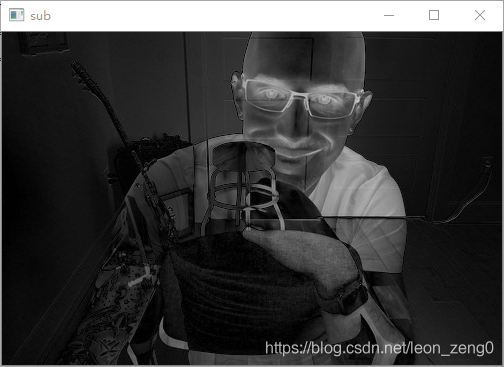
做減法時,轉換為int32,這樣可以有負值。然後取絕對值,再轉成類型uint8, opencv可以識別。
Python opencv 背景消除 圖片減法

- # perform background subtraction by subtracting the foreground from
- # the background and then taking the absolute value
- # 背景减法
- sub = bgGray.astype("int32") - fgGray.astype("int32")
- sub = np.absolute(sub).astype("uint8")
- cv2.imshow("sub",sub)
二值化處理
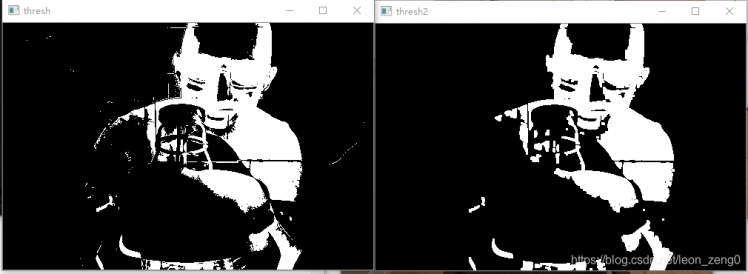
用Otsu 門檻法,轉換上面的減法結果為前景和背景,0為背景,255為前景。圖片效果為下面左邊圖。
然後我們erosion,再dilate消除噪聲,處理效果為下面右邊圖:
erosion dilate的詳細介紹可以看:https://opencv-python-tutroals.readthedocs.io/en/latest/py_tutorials/py_imgproc/py_morphological_ops/py_morphological_ops.html
Python opencv 背景消除 圖片減法

- # find contours in the thresholded difference map and then initialize
- # 发现边界
- # our bounding box regions that contains the *entire* region of motion
- cnts = cv2.findContours(thresh.copy(), cv2.RETR_EXTERNAL,cv2.CHAIN_APPROX_SIMPLE)
- cnts = imutils.grab_contours(cnts)
-
- #给边界初始值
- (minX, minY) = (np.inf, np.inf)
- (maxX, maxY) = (-np.inf, -np.inf)
-
- # loop over the contours
- # 循环计算边界
- for c in cnts:
- # compute the bounding box of the contour
- (x, y, w, h) = cv2.boundingRect(c)
-
- # reduce noise by enforcing requirements on the bounding box size
- # 如果边界值,w 或 w 小于20 就认为是噪音
- if w > 20 and h > 20:
- # update our bookkeeping variables
- minX = min(minX, x)
- minY = min(minY, y)
- maxX = max(maxX, x + w - 1)
- maxY = max(maxY, y + h - 1)
繪製長方形,並輸出圖形
- # draw a rectangle surrounding the region of motion
- # 绘制长方形
- cv2.rectangle(fg, (minX, minY), (maxX, maxY), (0, 255, 0), 2)
-
- # show the output image
- # 输出图形
- cv2.imshow("Output", fg)
- cv2.imshow("bg", bg)
- cv2.waitKey(0)
綜合在一起的代碼:
- # USAGE 使用方法
- # python image_sub.py --bg images/bg.jpg --fg images/adrian.jpg
-
- # import the necessary packages 输入必要的包
- import numpy as np
- import argparse
- import imutils
- import cv2
-
- # construct the argument parser and parse the arguments
- # 命令行参数处理,2个图片都存在imges 目录里,这里提供缺省值
- # 这根据你的情况,更改default 后的文件名,当然也可命令行输入
- ap = argparse.ArgumentParser()
- ap.add_argument("-b", "--bg", default='images/bg.jpg', help="path to background image")
- ap.add_argument("-f", "--fg", default='images/adrian.jpg', help="path to foreground image")
- args = vars(ap.parse_args())
-
- # load the background and foreground images
- # 导入背景,前景文件
- bg = cv2.imread(args["bg"])
- fg = cv2.imread(args["fg"])
-
- # convert the background and foreground images to grayscale
- # 灰度化处理
- bgGray = cv2.cvtColor(bg, cv2.COLOR_BGR2GRAY)
- fgGray = cv2.cvtColor(fg, cv2.COLOR_BGR2GRAY)
-
- # perform background subtraction by subtracting the foreground from
- # the background and then taking the absolute value
- # 背景减法
- sub = bgGray.astype("int32") - fgGray.astype("int32")
- sub = np.absolute(sub).astype("uint8")
- cv2.imshow("sub",sub)
-
- # threshold the image to find regions of the subtracted image with
- # larger pixel differences
- thresh = cv2.threshold(sub, 0, 255, cv2.THRESH_BINARY | cv2.THRESH_OTSU)[1]
- cv2.imshow("thresh",thresh)
-
- # perform a series of erosions and dilations to remove noise
- # erode ,dilate 降噪处理
- thresh = cv2.erode(thresh, None, iterations=1)
- thresh = cv2.dilate(thresh, None, iterations=1)
- cv2.imshow("thresh2",thresh)
-
- # find contours in the thresholded difference map and then initialize
- # 发现边界
- # our bounding box regions that contains the *entire* region of motion
- cnts = cv2.findContours(thresh.copy(), cv2.RETR_EXTERNAL, cv2.CHAIN_APPROX_SIMPLE)
- cnts = imutils.grab_contours(cnts)
-
- #给边界初始值
- (minX, minY) = (np.inf, np.inf)
- (maxX, maxY) = (-np.inf, -np.inf)
-
- # loop over the contours
- # 循环计算边界
- for c in cnts:
- # compute the bounding box of the contour
- (x, y, w, h) = cv2.boundingRect(c)
-
- # reduce noise by enforcing requirements on the bounding box size
- # 如果边界值,w 或 w 小于20 就认为是噪音
- if w > 20 and h > 20:
- # update our bookkeeping variables
- minX = min(minX, x)
- minY = min(minY, y)
- maxX = max(maxX, x + w - 1)
- maxY = max(maxY, y + h - 1)
-
- # draw a rectangle surrounding the region of motion
- # 绘制长方形
- cv2.rectangle(fg, (minX, minY), (maxX, maxY), (0, 255, 0), 2)
-
- # show the output image
- # 输出图形
- cv2.imshow("Output", fg)
- cv2.imshow("bg", bg)
- cv2.waitKey(0)
文章出處 |
|