|
|
由於我們公司需要開發訂單管理系統以及會員資料,所以我的任務就是把 OpenCart 改成可以和這些東西串接在一起。說穿了 OpenCart 在專案的角色就只是個商品展示櫥窗。
具體一點來說,整個購物流程到購物車以後就是交給訂單管理系統處理了,與 OpenCart 這邊無干。購物車送到訂單管理系統這邊由於公司那邊的程式架構問題,已經可想而知會串得哩哩辣辣,除非訂單管理系統的前輩願意也做一些對應的修改,不過對這點無用洪是不抱期望了...orz。會員資料就參考一般的串接第三方 api 方式即可,不過我們的登入 api 看起來應該是不會支援 FaceBook 或是 Google,倒也無妨,畢竟主要考慮服務還是在 b2b 上;
而庫存這段則是進銷存管理會處理,這邊基本上做個能夠自動和進銷存商品同步的機制就可以了。可能透過某個排程,或是手動匯入檔案上傳,或是兩個都做,基本上都不是大問題。或許到時候可以寫個 OpenCart 串接模組之類的東西,不過不知道好不好寫。
接著,由於我們面對的是批發商,所以要開發一個所謂的 "合約管理模組"。這個模組要能讓賣家對應不同客戶設定不同合約,該合約的內涵有:
1.可以自行對各種商品定義不同折扣率,因此換句話說客戶進到網站後看到的商品價格人人都不同
2.此模組還要具備所謂的模版功能,可以直接拿現有模版套用來改這樣 ~。
3.可設定結帳週期和結帳完幾天後應該付款,不過據主管說我們沒有要管到他們金流的部份,因此這邊應該只是簡單的增加欄位罷了。
最後,要有一個使用者操作記錄,目前看來 OpenCart 似乎並沒有這東西( 也可能只是我還沒發現 ),Google 也沒搜尋到相關的模組,應該又要自己寫了 > <。
下一步應該是...?
Google 了一下,大部分人都不建議去改程式碼,普遍建議是先摸熟後台功能在進行擴充,萬不得已再去修改。嗚...不過我的情況比較特別,不得不去改啊...。
稍微粗略看過後台,發現 OpenCart 有所謂模組管理,以前在ecshop 有看過類似的東西,看字面意思不難理解這應該是擴充 OpenCart 功能的地方,因此決定今天的目標就放在如何安裝及撰寫 OpenCart 模組吧。
OpenCart 模組如何安裝的?
先來找出 OpenCart 是如何擴充模組的吧!
找到後台模組設定相關頁面
前往
- admin/index.php?route=extension/module

搞懂模組安裝機制
找出安裝的程式碼!
觀察模組安裝路徑

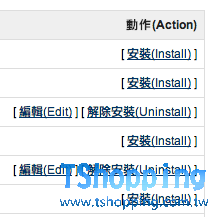
我選擇了 welcome 模組來觀察: ( 基本模組最下面那個 )
- <a href="http://localhost.wssc/admin/index.php?route=extension/module/install&token=0679625543f6153b349dcedd0e2e7ec2&extension=welcome">安裝(Install)</a>
該路徑的幾個重要參數來看一下:
route:
extension/module/install
表示會執行資料夾 admin/controller/extension下的 module.php 中的 install()方法。
token:
以下的程式碼告訴我們 token 到底用來幹嘛
admin/index.php
- <?php
- //...
- // Login
- $controller->addPreAction(new Action('common/home/login'));
然後 home.php 的 login()方法有利用 token 做以下判斷
admin/controller/common/home.php
- <?php
- //...
- if (!in_array($route, $ignore) && (!isset($this->request->get['token']) || !isset($this->session->data['token']) || ($this->request->get['token'] != $this->session->data['token'])))
如果 token 判斷沒過就會被導入登入首頁!
extension:
extension=welcome,表示載入的模組是 welcome 模組

來看看 module.php 的程式碼是吧,這裡有安裝模組的祕密喔!
- <?php
- //...
- public function install()
- {
- // ...
- $this->load->model('setting/extension');
- // Insert SQL Do HERE
- $this->model_setting_extension->install('module', $this->request->get['extension']);
- // ...
- }
1.關於 $this->load->model('setting/extension') 的 $this->load
load 屬性原本並不存在,因此觸發在父類別 Controller 中定義的 __get() 魔術方法
- <?php
- //...
- public function __get($key) {
- return $this->registry->get($key);
- }
該方法回傳了始在index.php
- <?php
- //...
- // Loader
- $loader = new Loader($registry);
- $registry->set('load', $loader);
- //...
就被註冊的 Loader實體給 $this->load。
2.$this->load->model('setting/extension')
Loader的 model()方法如下:
- <?php
- //...
- public function model($model)
- {
- $file = DIR_APPLICATION . 'model/' . $model . '.php';
- $class = 'Model' . preg_replace('/[^a-zA-Z0-9]/', '', $model);
- if (file_exists($file)) {
- include_once($file);
- $this->registry->set('model_' . str_replace('/', '_', $model), new $class($this->registry));
- } else {
- trigger_error('Error: Could not load model ' . $model . '!');
- exit();
- }
- }
可以看出來他會去新增一個 ModelSettingExtension 實體,然後將其存入 $this->registry 中。
3.- $this->model_setting_extension->install('module', $this->request->get['extension']);
同 $this->load 一樣的載入原理,$this->model_setting_extension被賦值後執行 install('module', $this->request->get['extension'])方法,方法內涵如下:
admin/model/setting/extension.php
- <?php
- //...
- public function install($type, $code)
- {
- $this->db->query("INSERT INTO " . DB_PREFIX . "extension SET `type` = '" . $this->db->escape($type) . "', `code` = '" . $this->db->escape($code) . "'");
- }
這邊於是乎將安裝的模組記錄進了資料庫,模組安裝也算完成囉。
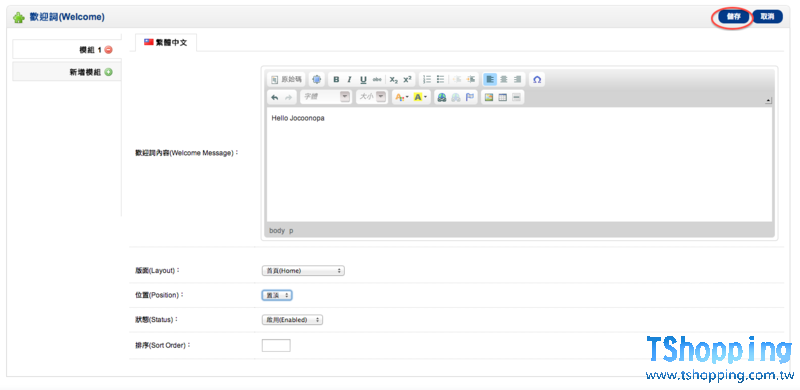
接著讓我們來編輯 Welcome 模組吧,順便了解模組是怎們運作的 !
OpenCart 模組運作探索( WELCOME )
前往編輯頁面

路徑: route=module/welcome 表示對應的controller在 /admin/controller/module/welcome.php
簡單看看 welcome.php 在做什們
welcome.php 包含了一個 ControllerModuleWelcome 類別,該類別有一個 index() 方法和 一個 validate()驗證權限的方法。
其中 index() 方法會生成我們現在看到的這頁編輯頁面,而其中有一段程式碼是判斷是否為 POST 請求如下:
- <?php
- if (($this->request->server['REQUEST_METHOD'] == 'POST') && $this->validate()) {
- $this->model_setting_setting->editSetting('welcome', $this->request->post);
- $this->session->data['success'] = $this->language->get('text_success');
- $this->redirect($this->url->link('extension/module', 'token=' . $this->session->data['token'], 'SSL'));
- }
則是我們在 welcome 的編輯頁儲存後會執行的動作。
$this->model_setting_setting 其實就是 ModelSettingSetting 的實體,位於 admin/model/setting/setting.php,裡頭的三個方法都是對 setting 這個 table 做一些操作。
要注意的地方是, setting table 的 value 是用BLOB格式儲存,存放的資料是將模組相關數值序列化後的字串。
如果今天我有兩個 welcome_module,

OpenCart 的 setting 資料表不會有兩條 welcome_module 的 row,只會有一條,但 value 這邊的值解除序列化後我們可以得到一個包含兩個元素的陣列,這樣的設計有好有壞,不過個人覺得有點不直覺,效能上其實也較差 ( Blob 格式是不會有 cache 的)。
而這個 setting 會在前台的 index.php 被載入,程式碼如下:
index.php
- <?php
- //...
- // Settings
- $query = $db->query("SELECT * FROM " . DB_PREFIX . "setting WHERE store_id = '0' OR store_id = '" . (int)$config->get('config_store_id') . "' ORDER BY store_id ASC");
- foreach ($query->rows as $setting) {
- if (!$setting['serialized']) {
- $config->set($setting['key'], $setting['value']);
- } else {
- $config->set($setting['key'], unserialize($setting['value']));
- }
- }
- //...
OpenCart 就是這樣來實現模組的機制的,並不難理解。
實際操作看看吧

然後回到首頁可以看到:

OK! 模組運作正常,再來就是更深入一點了解 welcome 模組是如何運作的吧 !
Welcome 從那兒被引入做了哪些事情?
1.首先我們前往產生首頁的 catalog/controller/common/home.php
沒有找到線索,開始從 $this->children 一個一個翻
2.catalog/controller/common/content_top.php
在 content_top.php 發現了以下這段程式碼,因此得知從這邊引入模組
catalog/controller/common/content_top.php
- <?php
- //...
- <?php
- $module_data = array();
- $this->load->model('setting/extension');
- $extensions = $this->model_setting_extension->getExtensions('module');
- foreach ($extensions as $extension) {
- $modules = $this->config->get($extension['code'] . '_module');
- if ($modules) {
- foreach ($modules as $module) {
- if ($module['layout_id'] == $layout_id && $module['position'] == 'content_top' && $module['status']) {
- $module_data[] = array(
- 'code' => $extension['code'],
- 'setting' => $module,
- 'sort_order' => $module['sort_order']
- );
- }
- }
- }
- }
- $sort_order = array();
- foreach ($module_data as $key => $value) {
- $sort_order[$key] = $value['sort_order'];
- }
- array_multisort($sort_order, SORT_ASC, $module_data);
- $this->data['modules'] = array();
- foreach ($module_data as $module) {
- $module = $this->getChild('module/' . $module['code'], $module['setting']);
- if ($module) {
- $this->data['modules'][] = $module;
- }
- }
- //...
以上這段程式碼大概流程是說:
1.從$this->model_setting_extension->getExtensions('module'); 找出註冊的模組,具體的動作其實是從 extension table 中取出 type="module" 的 row,
2.然後和config中的 module 比對,若存在則存入$module_data陣列,
3.最後再迭代此陣列並且透過 controller 的 getChild()方法引入並且執行每個模組對應的 controller及其方法。
controller 的 getChild 方法 echo 出路徑
system/engine/controller.php
- <?php
- // ...
- protected function getChild($child, $args = array()) {
- $action = new Action($child, $args);
- $file = $action->getFile();
- $class = $action->getClass();
- $method = $action->getMethod();
- echo $file." : 我的方法是" . $method ."<br/>";
- if (file_exists($file)) {
- require_once($file);
- $controller = new $class($this->registry);
- $controller->$method($args);
- return $controller->output;
- } else {
- trigger_error('Error: Could not load controller ' . $child . '!');
- exit();
- }
- }
- // ...
可以從輸出結果發現 welcome 的檔案路徑是 catalog/module/welcome.php,這邊我們也可以知道其實前台 module 都是放在 catalog/module 裡面。程式碼如下:
catalog/module/welcome.php
- <?php
- class ControllerModuleWelcome extends Controller {
- protected function index($setting) {
- $this->language->load('module/welcome');
- $this->data['heading_title'] = sprintf($this->language->get('heading_title'), $this->config->get('config_name'));
- $this->data['message'] = html_entity_decode($setting['description'][$this->config->get('config_language_id')], ENT_QUOTES, 'UTF-8');
- if (file_exists(DIR_TEMPLATE . $this->config->get('config_template') . '/template/module/welcome.tpl')) {
- $this->template = $this->config->get('config_template') . '/template/module/welcome.tpl';
- } else {
- $this->template = 'default/template/module/welcome.tpl';
- }
- $this->render();
- }
- }
重點擺在最後,可以發現 welcome 在前台有一個 welcome.tpl 的模版,( 內容如下 )
catelog/view/theme/default/template/module/welcome.tpl
- <div class="welcome"><?php echo $heading_title; ?></div>
- <?php echo $message; ?>
在瀏覽器看到就是:
- <div id="content"><div class="welcome">您好!歡迎來到 Your Store</div>
- <p>Hello Jocoonopa</p>
整個流程大概就是這樣囉~。
總結
我們整理一下在 OpenCart 新增一個 module 要做哪些更動吧:
後台
- /admin/controller/module/welcome.php => 類別: ControllerModuleWelcome
- /admin/view/template/module/welcome.tpl
- /admin/language/zh-TW/module/welcome.php => 相關內容設定
前台
- /catalog/language/zh-TW/module/welcome.php => 相關文字內容設定
- /catalog/controller/module/welcome.php => Controller
- /catelog/view/theme/default/template/module/welcome.tpl => View
可以看到要增加一個模組是有點麻煩的,而且這種新增是直接加一個 mvc 單元上去的新增,如果要修改原本的一些業務邏輯還是要去翻 code 出來一行一行修,很累人。
合約新功能是否適合以這方式加入
可以使用這種方式,但不是銀彈,可以想像有很多 hard code 的修改,看來我要用力趕工了...。
Next
依序探索 OpenCart 的使用者管理,會員中心,商品+分類,訂單+購物車 的程式碼實作,並據此規劃合約模組之撰寫。
轉帖:http://jocoomadao.logdown.com/
|
|