|
label 標籤控制元件通過用來顯示靜態的文字或者影象,它的內容一般來說不是動態的。當然,你可以根據你的需求來改變它的內容。
Tkinter Label.py- from sys import version_info
- if version_info.major == 2:
- import Tkinter as tk
- elif version_info.major == 3:
- import tkinter as tk
-
- app = tk.Tk()
- labelExample = tk.Label(app, text="This is a Label")
- labelExample.pack()
- app.mainloop()
程式執行後,會在主程式視窗內生成一個文字標籤。
Tkinter 標籤 控制元件

labelExample = tk.Label(app, text = "This is a label")labelExample 是在主視窗 app 內的一個顯示 This is a label 的標籤例項。
pack() 方法用來對主控制元件裡面的小控制元件來進行佈局分佈。它有如下的引數列表, pack() 方法 | 描述 | | after=widget | pack it after you have packed widget | | anchor=NSEW (or subset) | position widget according to | | before=widget | pack it before you will pack widget | | expand=bool | expand widget if parent size grows | | fill=NONE or X or Y or BOTH | fill widget if widget grows | | in=master | use master to contain this widget | | in_=master | see ‘in’ option description | | ipadx=amount | add internal padding in x direction | | ipady=amount | add internal padding in y direction | | padx=amount | add padding in x direction | | pady=amount | add padding in y direction | | side=TOP or BOTTOM or LEFT or RIGHT | where to add this widget. |
通過更改 pack() 的引數,你可以獲取不同的控制元件佈局。 標籤的尺寸是由屬於標籤選項中的寬度和高度來定義的。
備註
標籤內包含文字或者圖片的時候,它們的寬度及高度的單位是不同的。如果是文字的話,那單位就是單個字元的寬度;如果是圖片的話,那單位就是畫素了。
工慾善其事必先利其器,我們可以先來看看標籤物件裡面都有哪些屬性 options。通過 dict(label) 我們可以列出標籤物件的所有屬性。
Tkinter Label_Get Properties.py- from sys import version_info
- if version_info.major == 2:
- import Tkinter as tk
- elif version_info.major == 3:
- import tkinter as tk
-
- from pprint import pprint
-
- app = tk.Tk()
- labelExample = tk.Label(app, text="This is a Label", height=15, width=100)
- pprint(dict(labelExample))
得到的屬性字典如下,
{'activebackground': 'SystemButtonFace',
'activeforeground': 'SystemButtonText',
'anchor': 'center',
'background': 'SystemButtonFace',
'bd': <pixel object at 00000000048D1000>,
'bg': 'SystemButtonFace',
'bitmap': '',
'borderwidth': <pixel object at 00000000048D1000>,
'compound': 'none',
'cursor': '',
'disabledforeground': 'SystemDisabledText',
'fg': 'SystemButtonText',
'font': 'TkDefaultFont',
'foreground': 'SystemButtonText',
'height': 15,
'highlightbackground': 'SystemButtonFace',
'highlightcolor': 'SystemWindowFrame',
'highlightthickness': <pixel object at 00000000048FF100>,
'image': '',
'justify': 'center',
'padx': <pixel object at 00000000048FED40>,
'pady': <pixel object at 00000000048FF0D0>,
'relief': 'flat',
'state': 'normal',
'takefocus': '0',
'text': 'This is a Label',
'textvariable': '',
'underline': -1,
'width': 100,
'wraplength': <pixel object at 00000000048FED70>}
知道標籤的所有屬性後,那你就可以通過更改它們來得到不同的標籤外觀。
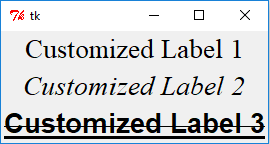
更改標籤文字字型你可以用下面的例子來改變標籤中的文字字型。
Tkinter Label_Set Text Font.py- from sys import version_info
- if version_info.major == 2:
- import Tkinter as tk
- elif version_info.major == 3:
- import tkinter as tk
- import tkFont
- app = tk.Tk()
- labelExample1 = tk.Label(app, text="Customized Label 1", font=("Times", 20))
- labelExample2 = tk.Label(app, text="Customized Label 2",
- font=("Times", 20, "italic"))
- labelFont3 = tkFont.Font(family="Helvetica", size=20, weight=tkFont.BOLD,
- underline=1, overstrike=1)
- labelExample3 = tk.Label(app, text="Customized Label 3",
- font=labelFont3)
- labelExample1.pack()
- labelExample2.pack()
- labelExample3.pack()
- app.mainloop()
Tkinter 標籤 控制元件

通過元組來設定標籤字型
- labelExample1 = tk.Label(app, text="Customized Label 1", font=("Times", 20))
- labelExample2 = tk.Label(app, text="Customized Label 2",
- font=("Times", 20, "italic"))
字型元組的第一個元素是字型名字,隨後的元素是大小,格式比如加粗,斜體,下劃線或者刪除線。
用 tkFont 字型物件來設定標籤字型- labelFont3 = tkFont.Font(family="Helvetica", size=20, weight=tkFont.BOLD,
- underline=1, overstrike=1)
- labelExample3 = tk.Label(app, text="Customized Label 3",
- font=labelFont3)
設定標籤文字字型屬性的另外一種方法是使用 tkFont 模組中的字型物件。labelExample3 的字型型別就是 Helvetica 字型系列,20 號,加粗,有下劃線以及粗細為 1 的刪除線。
Info
也許你想知道 Tkinter 中可用的字型系列,那下面的這段小程式就會把它們全部列出來。
Tkinter Label_Get Fonts List.py- from sys import version_info
- if version_info.major == 2:
- import Tkinter as tk
- elif version_info.major == 3:
- import tkinter as tk
- import tkFont
- from pprint import pprint
- app = tk.Tk()
- pprint(tkFont.families())
更改標籤顏色fg 及 bg 屬性分別確定了標籤控制元件的前景色及背景色。
Tkinter 標籤 控制元件

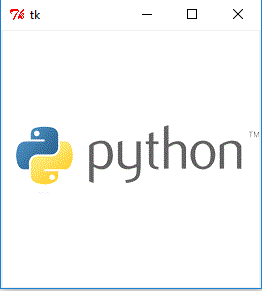
標籤中顯示圖片標籤中 image 屬性可以用來在標籤中顯示圖片。
Tkinter Lael_Display Image.py- from sys import version_info
- if version_info.major == 2:
- import Tkinter as tk
- elif version_info.major == 3:
- import tkinter as tk
-
- app = tk.Tk()
- logo = tk.PhotoImage(file='python.gif')
- labelExample = tk.Label(app, image=logo)
- labelExample.pack()
- app.mainloop()
Tkinter 標籤 控制元件

- <div class="panel panel-primary panel-warning">
- <div class="panel-heading">Warning</div>
- <div class="panel-body"><p><code>tk.PhotoImage</code> 只能顯示 GIF,PPM/PPM/PGM 格式的圖片。如果圖片是其他格式的話,那它會報如下錯誤,<em>_tkinter.TclError: couldn’t recognize data in image file</em></p>
文章出處
網頁設計,網站架設 ,網路行銷,網頁優化,SEO - NetYea 網頁設計
|