|
信用卡數字識別-流程預覽(可執行代碼請看頁尾)
opencv 信用卡 數字識別

一、基礎配置- # 匯入工具包
- from imutils import contours
- import numpy as np
- import argparse
- import cv2
- import myutils
- # 設定引數
- ap = argparse.ArgumentParser()
- ap.add_argument("-i","--image",default='./images/credit_card_01.png',help="path to input image")
- ap.add_argument("-t","--template",default='./ocr_a_reference.png',help="path to template OCR image")
- args = vars(ap.parse_args())
- # 指定信用卡型別
- FIRST_NUMBER = {"3": "American Express","4": "Visa","5": "MasterCard","6": "Discover Card"}
- # 繪圖展示
- def cv_show(name,img):
- cv2.imshow(name, img)
- cv2.waitKey(0)
- cv2.destroyAllWindows()
二、模板處理模板處理流程: 輪廓檢測, 外接矩形, 摳出模板, 讓模板對應每個數值
字典digits = {} # 存模板的單個數字
- # 讀取一個模板影象
- img = cv2.imread(args["template"])
- cv_show('template',img)
- # 灰度圖
- ref = cv2.cvtColor(img, cv2.COLOR_BGR2GRAY)
- cv_show('template_gray',ref)
- # 二值影象
- ref = cv2.threshold(ref, 10, 255, cv2.THRESH_BINARY_INV)[1]
- cv_show('template_bi',ref)
- # 1.計算輪廓
- # cv2.findContours()函式接受的引數為二值圖,即黑白的(不是灰度圖),cv2.RETR_EXTERNAL只檢測外輪廓,cv2.CHAIN_APPROX_SIMPLE只保留終點座標
- # 返回的list中每個元素都是影象中的一個輪廓
- refCnts, hierarchy = cv2.findContours(ref.copy(), cv2.RETR_EXTERNAL,cv2.CHAIN_APPROX_SIMPLE) # cv版本大於3.8的,只有兩個返回值
- cv2.drawContours(img,refCnts,-1,(0,0,255),3) # 輪廓在二值圖上得到, 畫要畫在原圖上
- cv_show('template_Contours',img)
- print (np.array(refCnts).shape)
- refCnts = myutils.sort_contours(refCnts, method="left-to-right")[0] #排序,從左到右,從上到下
- digits = {} # 存模板的單個數字
- # 2.遍歷每一個輪廓,外接矩形
- for (i, c) in enumerate(refCnts): # c是每個輪廓的終點座標
- # 計算外接矩形並且resize成合適大小
- (x, y, w, h) = cv2.boundingRect(c)
- # 3.摳出模板
- roi = ref[y:y + h, x:x + w] # 每個roi對應一個數字
- roi = cv2.resize(roi, (57, 88)) # 太小,調大點
- # 4.每一個數字對應每一個模板
- digits[i] = roi
opencv 信用卡 數字識別
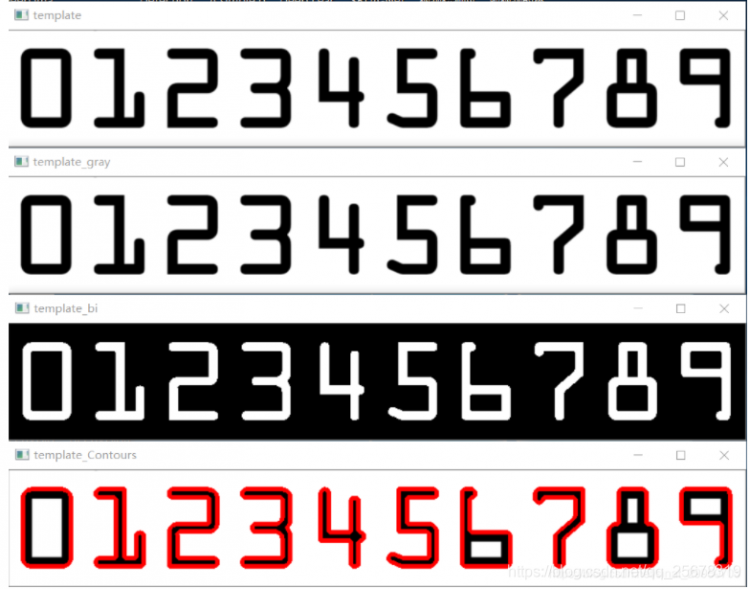
注:在自己動手實踐過程中,發現有以下幾個點需要注意(順一遍沒有大問題的同學, 可先跳過此處) - Line 8:因findCoutours 檢測黑底白字的物體,所以要選擇反轉的二值化THRESH_BINARY_INV
- Line 14:我們需要外輪廓,畫外接矩形,所以用cv2.RETR_EXTERNAL
- Line 23:enumerate() 函式用於將一個可遍歷的資料物件(如列表、元組或字串)組合為一個索引序列
seq = [‘one’, ‘two’, ‘three’]
for i, element in enumerate(seq):
… print i, element
…
0 one
1 two
2 three
- Line 27:側重於摳出單個數值的模板,而不是畫個rectangle
- Line 20,31:digits設定為字典,第i個健對應的第i個模板數值roi
- Line 19:對輪廓進行排序,並且返回兩個值,只需要輪廓[0]
refCnts = myutils.sort_contours(refCnts, method=“left-to-right”)[0]
排序前
opencv 信用卡 數字識別

排序後
opencv 信用卡 數字識別

也可以不排序,在後面數值與模板數值匹配時需要做相應改動,感興趣的同學自行研究 對輪廓進行排序的程式碼如下: - def sort_contours(cnts, method="left-to-right"):
- reverse = False
- i = 0
- if method == "right-to-left" or method == "bottom-to-top":
- reverse = True
- if method == "top-to-bottom" or method == "bottom-to-top":
- i = 1
- # 計算外接矩形 boundingBoxes是一個元組
- boundingBoxes = [cv2.boundingRect(c) for c in cnts] #用一個最小的矩形,把找到的形狀包起來x,y,h,w
- # sorted排序
- (cnts, boundingBoxes) = zip(*sorted(zip(cnts, boundingBoxes),
- key=lambda b: b[1][i], reverse=reverse))
- return cnts, boundingBoxes # 輪廓和boundingBoxess
三、輸入影象處理
opencv 信用卡 數字識別

- # 1.初始化卷積核,根據實際任務指定大小,不一定非要3x3
- rectKernel = cv2.getStructuringElement(cv2.MORPH_RECT, (9, 3))
- sqKernel = cv2.getStructuringElement(cv2.MORPH_RECT, (5, 5))
- # 2.讀取輸入影象,預處理
- image = cv2.imread(args["image"])
- cv_show('Input_img',image)
- image = myutils.resize(image, width=300)
- gray = cv2.cvtColor(image, cv2.COLOR_BGR2GRAY)
- cv_show('Input_gray',gray)
- # 3.禮帽操作,突出更明亮的區域
- # 形態學操作,禮帽+閉操作可以突出明亮區域,但並不是非得禮帽+閉操作
- tophat = cv2.morphologyEx(gray, cv2.MORPH_TOPHAT, rectKernel)
- cv_show('Input_tophat',tophat)
- # 4.x方向的Sobel運算元,實驗表明,加y的效果的並不好
- gradX = cv2.Sobel(tophat, ddepth=cv2.CV_32F, dx=1, dy=0,ksize=-1) #ksize=-1相當於用3*3的
- # x方向取絕對值 -> 歸一化
- gradX = np.absolute(gradX) # absolute: 計算絕對值
- (minVal, maxVal) = (np.min(gradX), np.max(gradX))
- gradX = (255 * ((gradX - minVal) / (maxVal - minVal)))
- gradX = gradX.astype("uint8")
- print (np.array(gradX).shape)
- cv_show('Input_Sobel_gradX',gradX)
- # 5.通過閉操作(先膨脹,再腐蝕)將數字連在一起. 將本是4個數字的4個框膨脹成1個框,就腐蝕不掉了
- gradX = cv2.morphologyEx(gradX, cv2.MORPH_CLOSE, rectKernel)
- cv_show('Input_CLOSE_gradX',gradX)
- # 6.THRESH_OTSU會自動尋找合適的閾值,適合雙峰,需把閾值引數設定為0
- thresh = cv2.threshold(gradX, 0, 255, cv2.THRESH_BINARY | cv2.THRESH_OTSU)[1]
- cv_show('Input_thresh',thresh)
- # 7.再來一個閉操作
- thresh = cv2.morphologyEx(thresh, cv2.MORPH_CLOSE, sqKernel) # 填補空洞
- cv_show('Input_thresh_CLOSE',thresh)
- # 8.計算輪廓
- threshCnts, hierarchy = cv2.findContours(thresh.copy(), cv2.RETR_EXTERNAL,
- cv2.CHAIN_APPROX_SIMPLE)
- cnts = threshCnts
- cur_img = image.copy()
- cv2.drawContours(cur_img,cnts,-1,(0,0,255),3)
- cv_show('Input_Contours',cur_img)
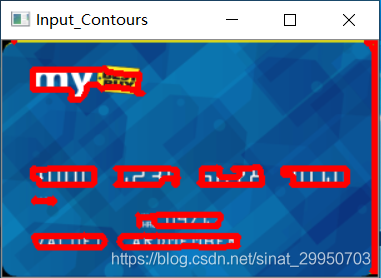
opencv 信用卡 數字識別
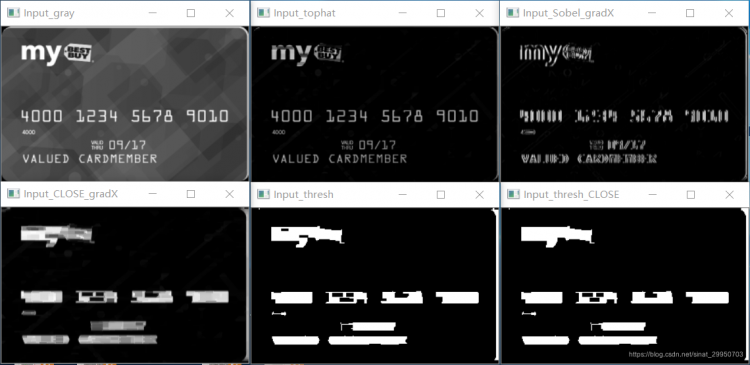
opencv 信用卡 數字識別
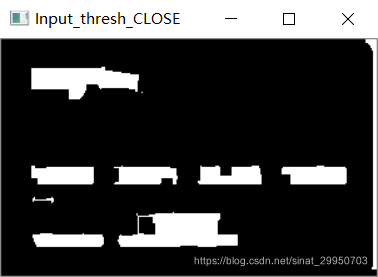
注: - Line 20-23:絕對值+歸一化
歸一化 x’ = (x-min)/(max-min) - Line 36:第二個閉操作換個9x9的核
onekernel = np.ones((9,9), np.uint8)
thresh = cv2.morphologyEx(thresh,cv2.MORPH_CLOSE,onekernel)
opencv 信用卡 數字識別
四、遍歷輪廓
- # 1.遍歷輪廓
- locs = [] # 存符合條件的輪廓
- for i,c in enumerate(threshCnts):
- # 計算矩形
- x,y,w,h = cv2.boundingRect(c)
- ar = w / float(h)
- # 選擇合適的區域,根據實際任務來,這裡的基本都是四個數字一組
- if ar > 2.5 and ar < 4.0:
- if (w > 40 and w < 55) and (h > 10 and h < 20):
- #符合的留下來
- locs.append((x, y, w, h))
- # 將符合的輪廓從左到右排序
- locs = sorted(locs,key=lambda x:x[0])
注: - Line 6-11:根據w和h的比例,選出包括4個數字的區域,視實際情況判定
- Line 14:
key=lambda 元素: 元素[欄位索引]
C = (sorted(C, key=lambda x: x[0]))
x:x[]字母可以隨意修改,排序方式按照中括號[]裡面的維度,[0]按照第一維,[1]按照第二維。
五、遍歷數字
- # 2.遍歷每一個輪廓中的數字
- output = [] # 存正確的數字
- for (i,(gx,gy,gw,gh)) in enumerate(locs): # 遍歷每一組大輪廓(包含4個數字)
- # initialize the list of group digits
- groupOutput = []
- # 根據座標提取每一個組(4個值)
- group = gray[gy-5:gy+gh+5, gx-5:gx+gw+5] # 往外擴一點
- cv_show('group_'+str(i),group)
- # 2.1 預處理
- group = cv2.threshold(group,0,255,cv2.THRESH_BINARY|cv2.THRESH_OTSU)[1] # 二值化的group
- # cv_show('group_'+str(i),group)
- # 計算每一組的輪廓 這樣就分成4個小輪廓了
- digitCnts = cv2.findContours(group.copy(),cv2.RETR_EXTERNAL,cv2.CHAIN_APPROX_SIMPLE)[0]
- # 排序
- digitCnts = myutils.sort_contours(digitCnts,method="left-to-right")[0]
- # 2.2 計算並匹配每一組中的每一個數值
- for c in digitCnts: # c表示每個小輪廓的終點座標
- z = 0
- # 找到當前數值的輪廓,resize成合適的的大小
- (x,y,w,h) = cv2.boundingRect(c) # 外接矩形
- roi = group[y:y+h,x:x+w] # 在原圖中取出小輪廓覆蓋區域,即數字
- roi = cv2.resize(roi, (57, 88))
- # cv_show("roi_"+str(z),roi)
-
- # 計算匹配得分: 0得分多少,1得分多少...
- scores = [] # 單次迴圈中,scores存的是一個數值 匹配 10個模板數值的最大得分
- # 在模板中計算每一個得分
- # digits的digit正好是數值0,1,...,9;digitROI是每個數值的特徵表示
- for (digit,digitROI) in digits.items():
- # 進行模板匹配, res是結果矩陣
- res = cv2.matchTemplate(roi,digitROI,cv2.TM_CCOEFF) # 此時roi是X digitROI是0 依次是1,2.. 匹配10次,看模板最高得分多少
- Max_score = cv2.minMaxLoc(res)[1] # 返回4個,取第二個最大值Maxscore
- scores.append(Max_score) # 10個最大值
- print("scores:",scores)
- # 得到最合適的數字
- groupOutput.append(str(np.argmax(scores))) # 返回的是輸入列表中最大值的位置
- z = z+1
- # 2.3 畫出來
- cv2.rectangle(image,(gx-5,gy-5),(gx+gw+5,gy+gh+5),(0,0,255),1) # 左上角,右下角
- # 2.4 putText引數:圖片,新增的文字,左上角座標,字型,字型大小,顏色,字型粗細
- cv2.putText(image,"".join(groupOutput),(gx,gy-15),
- cv2.FONT_HERSHEY_SIMPLEX,0.65,(0,0,255),2)
- # 2.5 得到結果
- output.extend(groupOutput)
- print("groupOutput:",groupOutput)
opencv 信用卡 數字識別
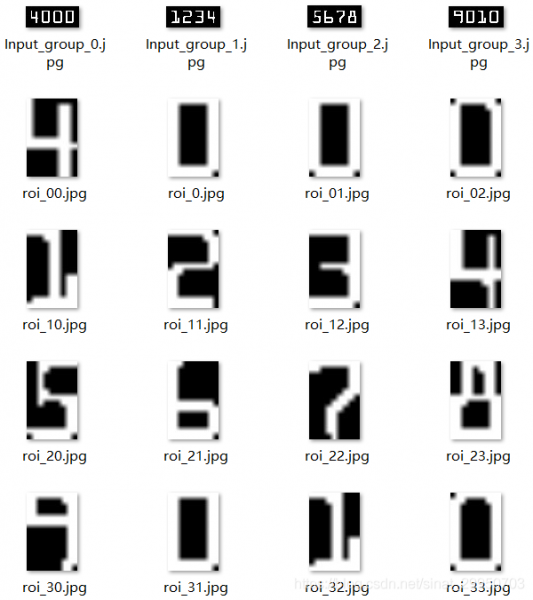
注: - 二的digits 是 模板中的單個數值(即五中的digitROI)
- 五的digitCnts -> group -> roi 是 輸入圖中的單個數值
- 輸入圖中的單個數值 和 模板中的單個數值 需進行相同的resize,否則無法進行匹配
roi = cv2.resize(roi, (57, 88)) - Line 11:對group的二值化預處理時(即 將一組輪廓group(4數字) 分為 4個小輪廓digitCnts前),必須加上cv2.THRESH_OTSU,否則檢測不出4個小輪廓
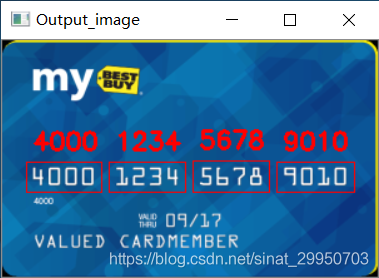
- Line 44:groupOutput中存的是每一組(4個)數值 如4000,因此在putText時,數值中間就不用空格或其他內容了,雙引號""中間沒有任何東西。
putText引數:圖片,新增的文字,左上角座標,字型,字型大小,顏色,字型粗細
putText的第3個引數是左上角的座標,因此在列印下一組groupOutput,它會重新以這組的(gx,gy-15)為新左上角座標
六、識別結果
- # 列印結果
- print("Credit Card Type: {}".format(FIRST_NUMBER[output[0]]))
- print("Credit Card #: {}".format("".join(output)))
- cv2.imshow("Output_image", image)
- cv2.waitKey(0)
- (10,)
- (189, 300)
- groupOutput: ['4', '0', '0', '0']
- groupOutput: ['1', '2', '3', '4']
- groupOutput: ['5', '6', '7', '8']
- groupOutput: ['9', '0', '1', '0']
- Credit Card Type: Visa
- Credit Card #: 4000123456789010
opencv 信用卡 數字識別
附:測試另外幾張信用卡數字識別的效果
opencv 信用卡 數字識別

- # Import toolkit
- from imutils import contours
- import imutils
- import numpy as np
- import argparse
- import cv2
- import myutils
-
- # Specify credit card type
- FIRST_NUMBER = {
- "3": "American Express",
- "4": "Visa",
- "5": "MasterCard",
- "6": "Discover Card"
- }
- # Drawing display
- def cv_show(name,img):
- cv2.imshow(name, img)
- cv2.waitKey(0)
- cv2.destroyAllWindows()
- # Read a template image
- img = cv2.imread('temp.png')
- cv_show('img',img)
- # Grayscale image
- ref = cv2.cvtColor(img, cv2.COLOR_BGR2GRAY)
- cv_show('ref',ref)
- # Binary image
- ref = cv2.threshold(ref, 10, 255, cv2.THRESH_BINARY_INV)[1]
- cv_show('ref',ref)
-
- # Calculate contour The parameter accepted by the #cv2.findContours() function is a binary image, that is, black and white (not grayscale), cv2.RETR_EXTERNAL only detects the outer contour, and cv2.CHAIN_APPROX_SIMPLE only retains the end point coordinates
- # Each element in the returned list is an outline in the image
-
- refCnts, hierarchy = cv2.findContours(ref.copy(), cv2.RETR_EXTERNAL,cv2.CHAIN_APPROX_SIMPLE)
-
- cv2.drawContours(img,refCnts,-1,(0,0,255),3)
- cv_show('img',img)
- print (np.array(refCnts).shape)
- refCnts = sorted(refCnts, key=lambda refCnts: cv2.boundingRect(refCnts)[0])
- digits = {}
- for (i, c) in enumerate(refCnts):
- # Calculate the circumscribed rectangle and resize it to a suitable size
- (x, y, w, h) = cv2.boundingRect(c)
- roi = ref[y:y + h, x:x + w]
- roi = cv2.resize(roi, (57, 88))
-
- # Each number corresponds to each template
- digits[i] = roi
-
- # Initialize the convolution kernel
- rectKernel = cv2.getStructuringElement(cv2.MORPH_RECT, (9, 3))
- sqKernel = cv2.getStructuringElement(cv2.MORPH_RECT, (5, 5))
-
- #Read input image, preprocess
- image = cv2.imread('xin.png')
- cv_show('image',image)
- #image = imutils.resize(image, height=900,width=900)
- gray = cv2.cvtColor(image, cv2.COLOR_BGR2GRAY)
- cv_show('gray',gray)
-
- #Top hat operation to highlight brighter areas
- tophat = cv2.morphologyEx(gray, cv2.MORPH_TOPHAT, rectKernel)
- cv_show('tophat',tophat)
- gradX = cv2.Sobel(tophat, ddepth=cv2.CV_32F, dx=1, dy=0, ksize=-1)
-
-
- gradX = np.absolute(gradX)
- (minVal, maxVal) = (np.min(gradX), np.max(gradX))
- gradX = (255 * ((gradX - minVal) / (maxVal - minVal)))
- gradX = gradX.astype("uint8")
-
- print (np.array(gradX).shape)
- cv_show('gradX',gradX)
-
- #Connect the numbers together by closing operation (expansion first, then corrosion)
- gradX = cv2.morphologyEx(gradX, cv2.MORPH_CLOSE, rectKernel)
- cv_show('gradX',gradX)
- #THRESH_OTSU will automatically find a suitable threshold, suitable for double peaks, you need to set the threshold parameter to 0
- thresh = cv2.threshold(gradX, 0, 255,cv2.THRESH_BINARY | cv2.THRESH_OTSU)[1]
- cv_show('thresh',thresh)
-
- # Close operation
-
- thresh = cv2.morphologyEx(thresh, cv2.MORPH_CLOSE, sqKernel) #Another closed operation
- cv_show('thresh',thresh)
-
- # Calculate contour
-
- threshCnts, hierarchy = cv2.findContours(thresh.copy(), cv2.RETR_EXTERNAL, cv2.CHAIN_APPROX_SIMPLE)
-
- cnts = threshCnts
- cur_img = image.copy()
- cv2.drawContours(cur_img,cnts,-1,(0,0,255),3)
- cv_show('img',cur_img)
- locs = []
-
- # Traverse the outline
- for (i, c) in enumerate(cnts):
- # Calculate rectangle
- (x, y, w, h) = cv2.boundingRect(c)
- ar = w / float(h)
-
- # Select the appropriate area, according to the actual task, basically here are a group of four numbers
- if ar > 2.5 and ar < 4.0:
- if (w > 40 and w < 55) and (h > 10 and h < 20):
- #Consistent stay
- locs.append((x, y, w, h))
-
- # Sort matching contours from left to right
- locs = sorted(locs, key=lambda x:x[0])
- output = []
-
- # Iterate over the numbers in each outline
- for (i, (gX, gY, gW, gH)) in enumerate(locs):
- # initialize the list of group digits
- groupOutput = []
-
- # Extract each group according to coordinates
- group = gray[gY - 5:gY + gH + 5, gX - 5:gX + gW + 5]
- cv_show('group',group)
- # Preprocessing
- group = cv2.threshold(group, 0, 255,
- cv2.THRESH_BINARY | cv2.THRESH_OTSU)[1]
- cv_show('group',group)
- # Calculate the outline of each group
- digitCnts,hierarchy = cv2.findContours(group.copy(), cv2.RETR_EXTERNAL,cv2.CHAIN_APPROX_SIMPLE)
- digitCnts = contours.sort_contours(digitCnts,
- method="left-to-right")[0]
-
- # Calculate each value in each group
- for c in digitCnts:
- # Find the outline of the current value and resize it to a suitable size
- (x, y, w, h) = cv2.boundingRect(c)
- roi = group[y:y + h, x:x + w]
- roi = cv2.resize(roi, (57, 88))
- cv_show('roi',roi)
-
- # Calculate match score
- scores = []
-
- # Calculate each score in the template
- for (digit, digitROI) in digits.items():
- # Template matching
- result = cv2.matchTemplate(roi, digitROI,cv2.TM_CCOEFF)
- (_, score, _, _) = cv2.minMaxLoc(result)
- scores.append(score)
-
- # Get the most suitable number
- groupOutput.append(str(np.argmax(scores)))
-
- # Draw it
- cv2.rectangle(image, (gX - 5, gY - 5),(gX + gW + 5, gY + gH + 5), (0, 0, 255), 1)
- cv2.putText(image, "".join(groupOutput), (gX, gY - 15),cv2.FONT_HERSHEY_SIMPLEX, 0.65, (0, 0, 255), 2)
-
- # got the answer
- output.extend(groupOutput)
-
- # Print result
- #print("Credit Card Type: {}".format(FIRST_NUMBER[output[0]]))
- print("Credit Card #: {}".format("".join(output)))
- cv2.imshow("Image", image)
- cv2.waitKey(0)
文章出處
網頁設計,網站架設 ,網路行銷,網頁優化,SEO - NetYea 網頁設計
|
